Navigation bar or menu is an essential element of any website. It helps visitors navigate through the website and find the information they need. In WordPress, the navigation bar is called the menu, and it is typically located at the top of the website.
By default, WordPress comes with a basic menu that includes links to pages, categories, and custom links. However, you can easily edit the navigation bar in WordPress and customize it to your liking.
In this beginner’s guide, we will show you how to edit navigation bar in WordPress and create a customized menu that improves user experience.
Table of Contents
Navigation Bar in WordPress
When you visit a website, the navigation bar is typically the first thing you see. It contains links to different pages and sections of the website, allowing visitors to navigate through the site easily. In WordPress, the navigation bar is called the menu, and it is created using the Menu Editor.
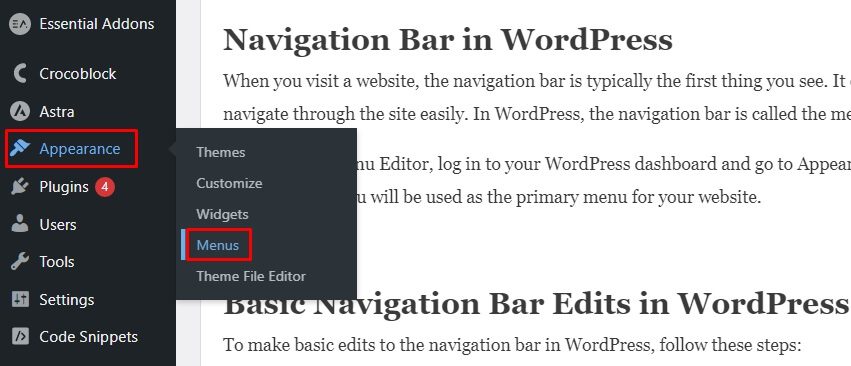
To access the Menu Editor, log in to your WordPress dashboard and go to Appearance > Menus. Here, you can create a new menu or edit an existing one. You can also select which menu will be used as the primary menu for your website.

Basic Navigation Bar Edits in WordPress
To make basic edits to the navigation bar in WordPress, follow these steps:
- Log in to your WordPress dashboard and go to Appearance > Menus.
- Select the menu you want to edit from the drop-down list.
- To add a new page to the menu, select the page from the list of available pages and click the Add to Menu button.
- To rearrange the order of menu items, drag and drop them to the desired position.
- To remove a menu item, click the down arrow next to the item and select Remove.
Advanced Navigation Bar Customization in WordPress
If you want to customize the navigation bar in WordPress further, you can use the following advanced options:
Custom Links: In the Menu Editor, you can add custom links to your menu. This allows you to link to external websites, social media profiles, or any other page that is not part of your website.
Categories: If you have a blog on your website, you can add categories to your menu. This allows visitors to navigate through your blog posts more easily.
Sub-Menus: You can create sub-menus in WordPress by dragging a menu item to the right. This allows you to create a hierarchical menu that is easier to navigate.
Mega Menus: Mega menus are advanced menus that allow you to display more information than a traditional menu. They are typically used on websites with a lot of content or eCommerce sites.

FAQs: WordPress Navigation Bar
How do I change the font color of my navigation bar in WordPress?
To change the font color of your navigation bar in WordPress, you will need to use CSS. You can add custom CSS to your website by going to Appearance > Customize > Additional CSS.
Can I have multiple navigation bars on my WordPress website?
Yes, you can have multiple navigation bars on your WordPress website. You can create multiple menus and assign them to different locations on your website.
How do I add a dropdown menu to my navigation bar in WordPress?
To add a dropdown menu to your navigation bar in WordPress, you can create a sub-menu. To create a sub-menu, drag a menu item to the right until it indents. The indented menu item will become a sub-menu item. You can then add more items to the sub-menu.
Conclusion: How to Edit Navigation Bar in WordPress
In conclusion, editing the navigation bar in WordPress is a simple process that can significantly improve your website’s user experience. By customizing your menu, you can make it easier for visitors to navigate your website and find the information they need.
Whether you want to make basic edits or advanced customizations, WordPress provides you with the tools to create a menu that suits your needs. We hope this beginner’s guide has helped you understand how to edit navigation bar in WordPress and create a customized menu that enhances your website’s usability.
You can also read:


